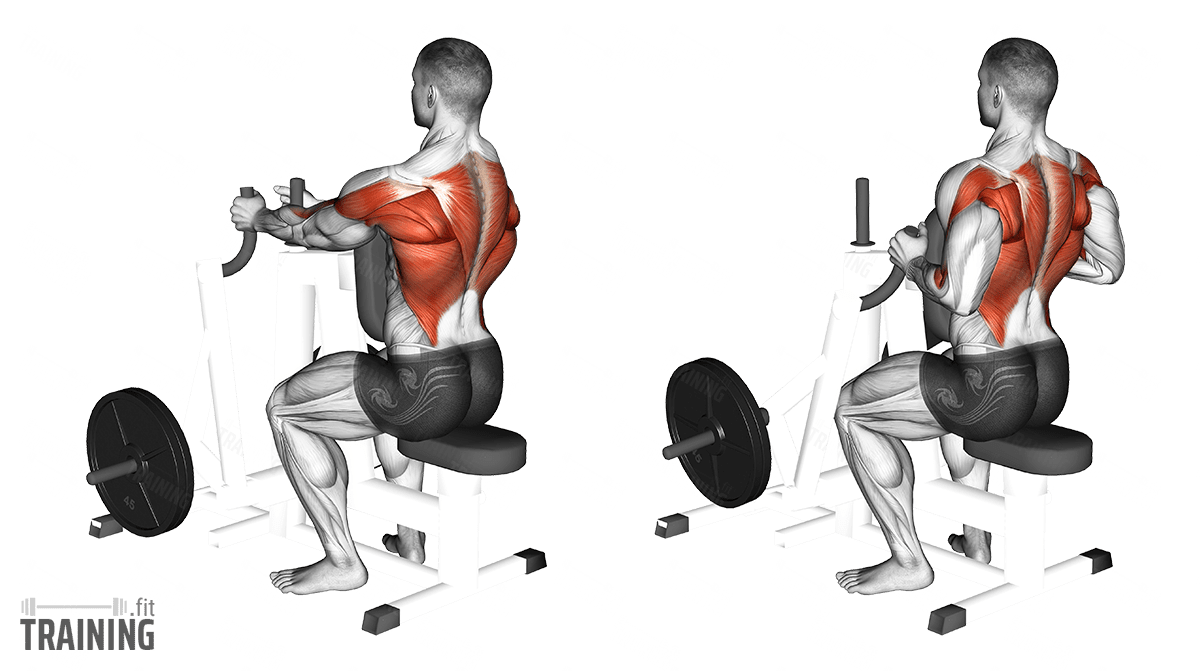
Seated Machine Row
Compound exercise, MachineOverview
Main muscles
- Biceps: Arm flexor
(Musculus biceps brachii) - Upper arm: Coracobrachialis muscle
(Musculus coracobrachialis) - Neck: Trapezius muscle
(Musculus trapezius) - Back: Large round muscle
(Musculus teres major) - Back: Large back muscle
(Musculus latissimus dorsi) - Back: Larger rhomboid muscle
(Musculus rhomboideus major) - Back: Small round muscle
(Musculus teres minor) - Shoulder: Posterior deltoid muscle
(Musculus deltoideus, posterior deltoid muscle)
Training plans
Here you can find example plans for seated machine row training:
Seated Machine Row: Basics and alternatives
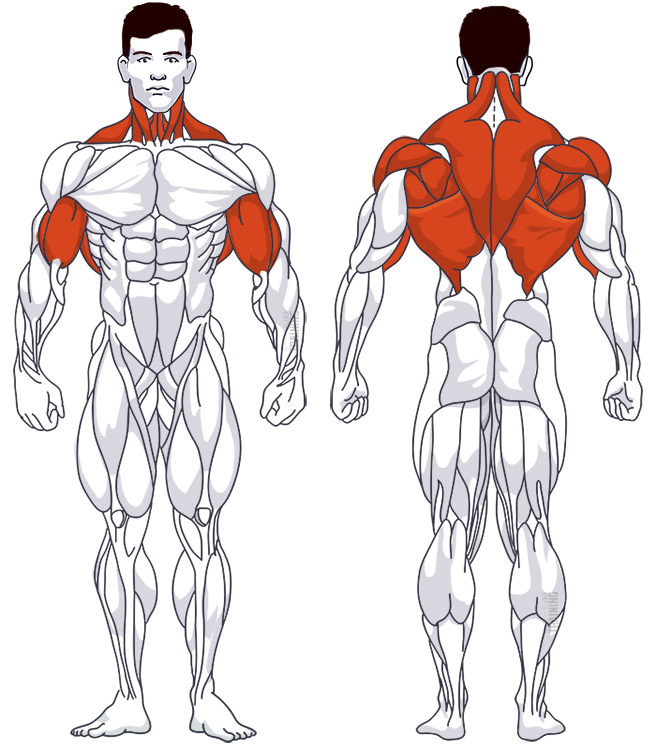
Involved main muscle groups:
Seated Machine Row
Seated Machine Row is a popular and especially beginner-friendly exercise for training the back. The movement is pretty much the same as with other rowing variations: With an upright upper body, you pull the weight towards you. Compared to free training, the potential for error is relatively low due to the guided machine movement.
An alternative is the Cable Row. For home use, the Resistance Band Row is also a good option. You can also consider Barbell Rowing or Dumbbell Rowing on an Incline Bench as free exercises with training weight. As a bodyweight exercise, the Inverted Row is suitable again.
Important: Don’t confuse this strength exercise with rowing on a rowing machine. Although the muscles are also trained with a rowing machine, a large focus is also on endurance training. While the legs remain firmly on the ground or in the designated holding positions on the machine during strength training with a rowing machine, they are also bent and extended during endurance training with a rowing machine.
Correct execution
As already mentioned, the great advantage of rowing on the machine is the elimination of potential sources of error. Since the movement is predetermined by the machine and the chest pad stabilizes the upper body, incorrect positions can also be avoided in the initial phase.
Suitable machines offer various adjustment options for this, such as the height of the seat or the distance of the chest pad.
The movement sequence can vary slightly depending on the machine design. Depending on the construction, the movement can be neutral (parallel to the ground) or slightly inclined (positive or negative). This ultimately doesn’t affect the training intensity.
Grip variation in machine rowing
The grip then plays a bigger role. Most rowing machines allow you to row with either a parallel/hammer grip or an upper/lower grip. Regardless of the grip, the same muscles are loaded. But the grip decides decisively about the focus and the supporting muscles.
In the lower grip, you can bring your elbows close to your body and activate the lat more strongly. The same applies to the parallel/hammer grip. In the lower grip, the support from the biceps is again a bit greater, so that most people can move more weight with the different rowing variants. The parallel/hammer grip, on the other hand, focuses more on the trapezius muscle (neck).
The upper grip ensures that the elbows are not brought so close to the body. This trains the lat and the rear shoulders more strongly.
Depending on your goal, you can choose the grip accordingly. Generally, no variant is better or worse than another.
Video tutorial
Step-by-Step instructions
Sit on the machine facing the chest pad.
Adjust the seat height so that you can reach the handles when you extend your arms without too much inclination.
Adjust the distance of the chest pad so that you can reach the handles with straight arms and pulled shoulders with your fingertips. Your upper body presses against the chest pad.
Bend your shoulders forward a little and grab the handles in your preferred grip (see above).
Straighten your upper body again and pull your shoulder blades back. You also pull the handles back a little – but your arms remain slightly bent.
Now pull the handles towards your upper body. The movement is predetermined by the machine. Depending on the grip, you guide your elbows close to your body. Pull the handles as far back as your musculoskeletal system or the machine allows.
Slowly and controlled, let the handles and the weight go back to the starting position. Keep your shoulder blades pulled in throughout the execution.
Common mistakes
Keep your upper body straight during your machine training. Avoid bending your upper body or shoulders in the extension movement. You can most easily avoid this problem, especially with the parallel or under grip, by keeping your elbows close to your body and keeping your shoulder blades pulled in throughout the entire movement.