Resistance Band Bird Dog
Compound exercise, Body weightThis article is verified by 3 studies/publications.
Overview
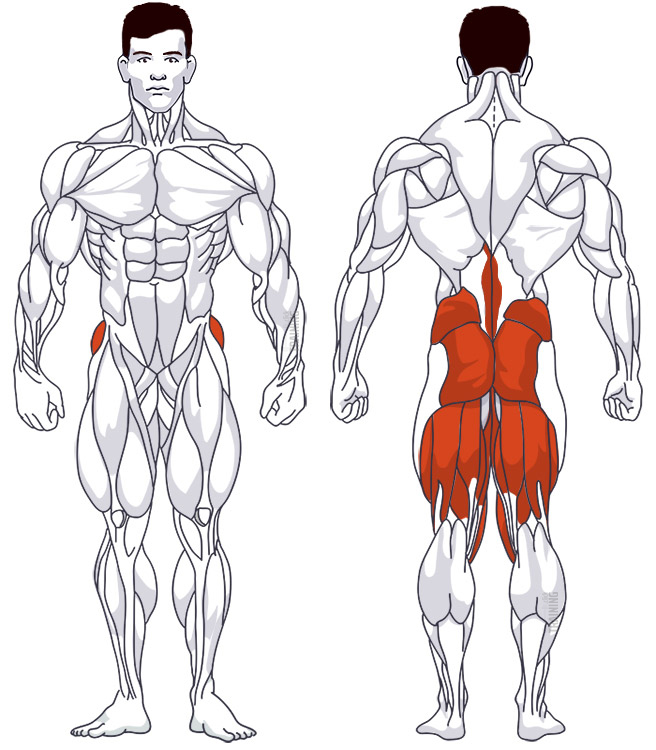
Main muscles
- Back: Back extensor
(Musculus erector spinae) - Buttocks: Large gluteus maximus
(Musculus gluteus maximus) - Abdomen: Straight abdominal muscle
(Musculus rectus abdominis)
Training plans
Resistance Band Bird Dog is a suitable substitute for similar exercises in lower back training or as a supplement to various training plans.
Resistance Band Bird Dog: Basics and alternatives
Involved main muscle groups:
Resistance Band Bird Dog
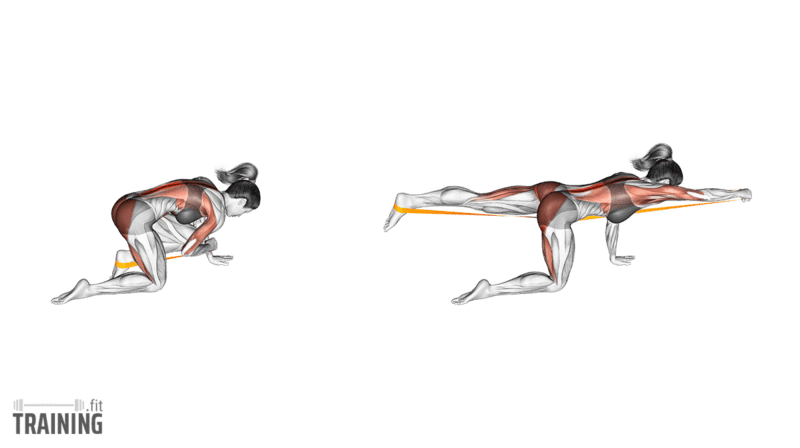
The banded bird dog adds resistance to the bird dog, a classic core exercise. You’ll hold one end of the band, and the other end sits securely around your opposite foot. As you reach your arm forward and your leg back, the band stretches, while your supporting hand and knee keep you balanced.
Your abs and back keep your trunk steady as the band stretches and shortens. The dead bug offers a supported alternative for practicing control of your pelvis while your legs move. Learn the ordinary bird dog before adding a band so you can tell whether the resistance changes your movement.
Correct execution
Choose a light band long enough to let you extend your arm and leg without overstretching it. Check that it’s in good condition and that the loop around your foot and your grip are secure. Get onto your hands and knees with the band running between your opposite hand and foot, clear of your supporting limbs.
Brace gently and reach your banded arm and leg away from each other. Keep your pelvis facing the floor and your back in roughly its starting position. Stop before the band pulls your shoulder toward your ear or makes you arch your back. Control the band’s pull as you bring your arm and leg back. You can bring your elbow and knee inward as shown, but don’t let the band snap them together. Finish one side, then reposition the band and switch.
Check the band at the start and during a short reach. It should let your working hand and knee rest on the floor without pulling you forward, and stay secure as you extend. Hold similar lengths on both sides for comparable resistance; don’t shorten it by wrapping it tightly around your fingers.
Keep your reaching wrist in line with your forearm and the loop seated around your foot, not just hooked over your toes. Straighten your knee as you push your heel back, and reach your arm forward from the shoulder as well as straightening your elbow, while your supporting arm stays steady.
Video tutorial
Step-by-step instructions
Check that your light band is in good condition.
Secure it around one foot and in the opposite hand.
Set up on all fours with your supporting hand under your shoulder and knee under your hip.
Brace your trunk and reach the banded hand forward and foot backward.
Stop the reach before your pelvis turns, your back arches or your shoulder shrugs.
Bring your arm and leg back under control, keeping the band secure.
Finish that side, put your hand and knee back down and move the band to the other side.
Common mistakes
A band that’s too strong can pull your torso out of position before you finish the reach. Switch to a lighter band or shorten the movement; forcing your arm and leg higher won’t help.
Rushing the return is a common mistake: the band then moves your arm and leg for you, so stay just as controlled on the way back. Stop to reset if the loop slips toward your toes or your grip feels unstable, and keep the band clear of your face.
If the band catches under your supporting knee, stop and free it with your working hand and knee back on the floor. Pulling harder can suddenly release the trapped section and change the resistance in mid-repetition.
What the science says
Although little research examines the banded version, the regular bird dog is a well-studied core exercise. These studies measured muscle activity in single sessions, so they show which muscles work to keep you steady, not how much stronger those muscles get over time.
In a study with 29 healthy volunteers, the bird dog worked the deeper side ab muscle (internal oblique) hardest on the side of the raised arm. The lower back muscles worked hardest on the opposite side. Lifting a leg during bridge exercises also increased oblique activity, as the trunk had to resist rotation.[1]
A small study with 8 healthy men looked at progressions of the bird dog, curl-up and side bridge. Adding movement to the bird dog, such as drawing squares in the air with the hand or foot, increased the activity of many muscle groups. Bracing the abdominal wall generally raised oblique activity across the tested exercises.[2]
When 30 healthy volunteers did 3 exercises on all fours, the deep back muscles next to the spine (multifidus) and the glute muscle on the side of the lifted leg were consistently the most active. During the opposite arm and leg raise, the side abdominal muscles and parts of the long back muscles also worked hard, while activity in the six-pack muscle (rectus abdominis) remained below 10% of its maximum.[3]
Sources
- Trunk muscle activation during stabilization exercises with single and double leg support. García-Vaquero MP, Moreside JM, Brontons-Gil E, Peco-González N, Vera-Garcia FJ. Journal of Electromyography and Kinesiology. 2012;22(3):398–406. doi: 10.1016/j.jelekin.2012.02.017.
- Exercises for Spine Stabilization: Motion/Motor Patterns, Stability Progressions, and Clinical Technique. McGill SM, Karpowicz A. Archives of Physical Medicine and Rehabilitation. 2009;90(1):118–126. doi: 10.1016/j.apmr.2008.06.026.
- Electromyographic activity of trunk and hip muscles during stabilization exercises in four-point kneeling in healthy volunteers. Stevens VK, Vleeming A, Bouche KG, Mahieu NN, Vanderstraeten GG, Danneels LA. European Spine Journal. 2007;16(5):711–718. doi: 10.1007/s00586-006-0181-1.