Heel Glute Bridge
Isolation exercise, Body weightThis article is verified by 3 studies/publications.
Overview
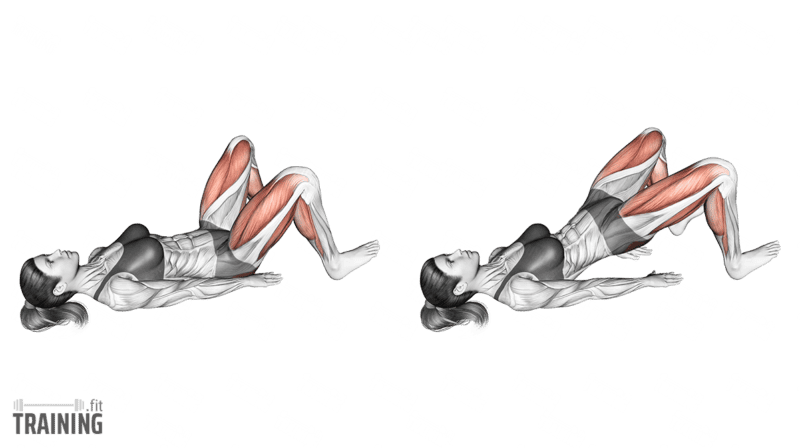
Main muscles
- Buttocks: Large gluteus maximus
(Musculus gluteus maximus) - Thigh: Thigh flexor
(Musculus biceps femoris)
Training plans
Heel Glute Bridge is a suitable substitute for similar exercises in Butt training or as a supplement to various training plans.
Heel Glute Bridge: Basics and alternatives
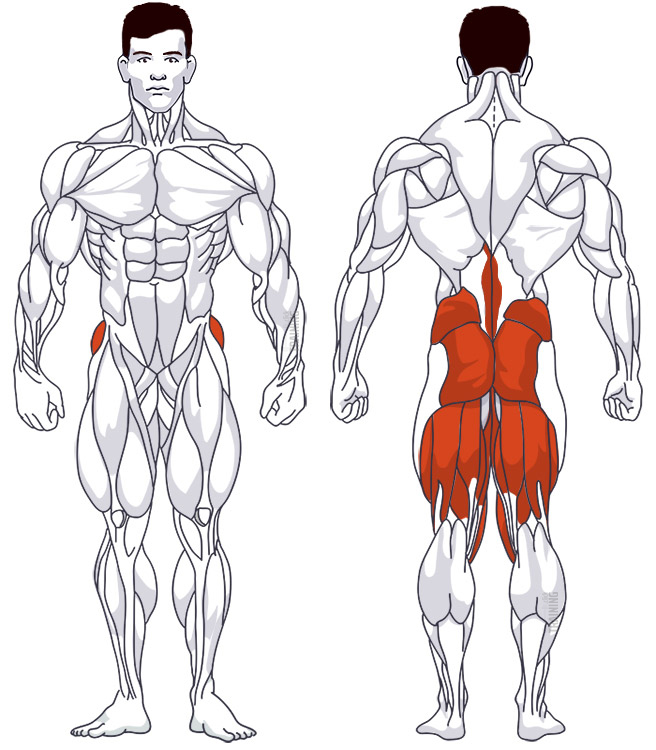
Involved main muscle groups:
Heel Glute Bridge
For the heel glute bridge, keep both heels on the floor and your toes raised. Bend your knees and lift your hips to work your butt and the backs of your thighs. There’s no bench or platform under your heels.
You can use the ordinary flat-footed bridge if keeping your toes up distracts you from the hip movement. Glute bridge marches change the support by lifting one foot at a time instead. Here, both heels remain down for the whole repetition.
Correct execution
Lie on your back and place your heels about hip-width apart. Lift the fronts of your feet gently toward your shins without sliding your heels away. Place your heels far enough from your butt that you can raise your hips comfortably while keeping your knees bent and steady.
Brace your core and press through your heels. Lift your hips until your shoulders, hips and knees form a roughly straight line, while your upper back and head stay supported on the floor. Hold briefly, then lower slowly. Your toes only need to stay comfortably raised, so don’t force a larger range at your ankles or arch your lower back to lift your hips higher.
Keep your knees bent as you rise. Sliding your heels away changes the knee angle and leverage. Marking their starting position on the mat can help you notice small slips.
Lift the fronts of your feet just enough to clear the floor and keep your toes relaxed. A thin, firm surface under your heels works well, since a thick pillow can wobble or let your heels sink unevenly. If you’re wearing socks, check that your heels don’t slide. Keep your arms relaxed beside you, with your weight spread across both heels and your upper back.
Video tutorial
Step-by-step instructions
Lie on your back with bent knees and your heels resting on the floor around hip-width apart.
Lift your toes and forefeet while keeping both heels planted.
Rest your arms beside you and lightly brace your abdomen.
Push through your heels and raise your hips without letting your feet slide.
Pause briefly at the top, then lower your pelvis slowly. Keep the same heel contact or reset your feet before repeating.
Common mistakes
If your heels slip, your feet can move farther away with each repetition. Use a surface that holds them in place and reset when needed.
Rising onto your toes is the opposite of what this variation asks for. Keep your heels down, or return to a flat-footed bridge if you can’t support yourself steadily. Stop when your hips line up with your shoulders and knees; don’t arch your lower back for extra height.
Don’t confuse this exercise with a bridge walkout, where your feet deliberately move away from your body. Here your heel position stays fixed. If cramping interrupts the movement, lower your hips, relax your legs and check how far your heels are from your butt before continuing.
What the science says
Lifting the toes during a bridge is often suggested as a way to put more of the work on the glutes. Only a few studies have tested foot position during bridges, and they measured muscle activity in single sessions, which shows how hard a muscle works, not how much it grows.
In a 2024 study, 10 men and 10 women did 5 bridge variations with flat feet and with only their heels on the floor. In the regular two-leg bridge, the main glute muscle (gluteus maximus) was similarly active in both positions, but the hamstrings were significantly less active with the toes up. Flat feet produced more hamstring activity in all 5 bridges. Raising the toes increased front thigh, inner thigh and side ab activity in some single-leg versions.[1]
In a 2018 study with 16 men, two-leg and single-leg bridges were tested with the knees bent to 30, 60, 90 or 120 degrees. These knee angles produced no difference in glute activity, but did affect hamstring and lower back activity.[2]
A 2024 study with 22 futsal players looked at single-leg bridges with the knee bent to 45 degrees. With only the heel on the floor, turning the foot outward increased activity in the outer hamstring (biceps femoris) and reduced it in the outer calf muscle, compared with keeping the foot straight. The researchers didn’t measure glute activity.[3]
Lifting the toes appears to have a greater effect on hamstring activity than on glute activity.
Sources
- Effects of Ankle Position While Performing One- and Two-Leg Floor Bridging Exercises on Core and Lower Extremity Muscle Recruitment. Escamilla RF, Thompson IS, Carinci J, MacLean D, MacLean L, Aguinaldo AL. Bioengineering. 2024;11(4):356. doi: 10.3390/bioengineering11040356.
- Differences in the Electromyographic Activity of the Hamstring, Gluteus Maximus, and Erector Spinae Muscles in a Variety of Kinetic Changes. Hirose N, Tsuruike M. Journal of Strength and Conditioning Research. 2018;32(12):3357–3363. doi: 10.1519/jsc.0000000000002747.
- Does the Position of the Ankle Matter During the Single Gluteal Bridge in Futsal Players? An Electromyographic Analysis. Elias G, Jerez-Mayorga D, Intelangelo L. Journal of Sport Rehabilitation. 2024;33(2):73–78. doi: 10.1123/jsr.2022-0425.