Glute Bridge March
Compound exercise, Body weightThis article is verified by 3 studies/publications.
Overview
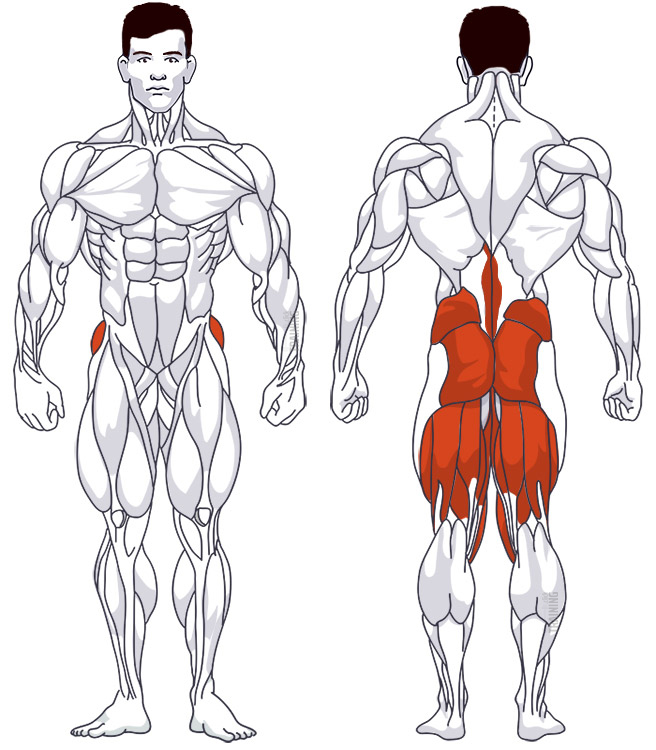
Main muscles
- Buttocks: Large gluteus maximus
(Musculus gluteus maximus) - Thigh: Thigh flexor
(Musculus biceps femoris)
Training plans
Glute Bridge March is a suitable substitute for similar exercises in Butt training or as a supplement to various training plans.
Glute Bridge March: Basics and alternatives
Involved main muscle groups:
Glute Bridge March
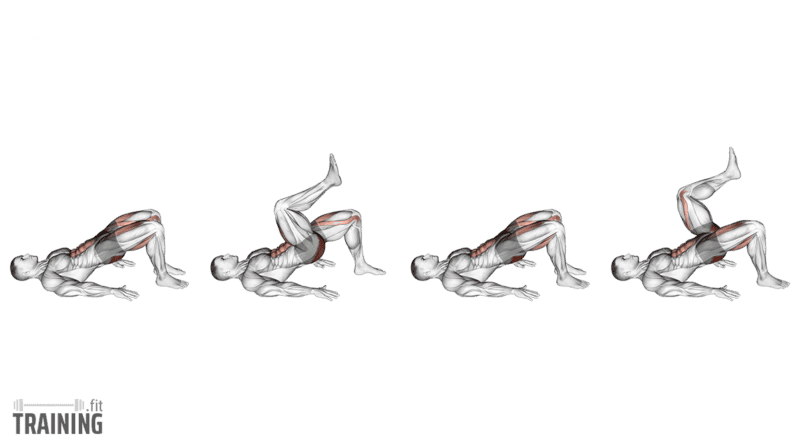
In the glute bridge march, you hold your hips up as you lift one foot, put it back down and switch sides. The butt and hamstrings on your supporting side hold the bridge while your core controls your pelvis.
Learn to hold a steady two-foot bridge before marching. During the march, your shoulders stay on the floor and the aim is to keep your pelvis from rocking with each step.
Correct execution
Lie on your back with your knees bent, both feet flat and your arms beside you. Lift your hips into a bridge while keeping your upper back on the floor. Brace your abs and hold your hips steady before lifting either foot.
Shift your weight onto one foot and lift the other just clear of the floor, keeping that knee bent. Start by taking a little weight off the foot while the toes still touch, then lift it if your pelvis stays level. Once that feels steady, you can raise your knee higher, as in the illustration, without drawing it all the way to your chest.
Place the whole foot back in its original spot and briefly support yourself on both feet before lifting the other leg. Keep your hips at roughly the same height throughout. Take separate, controlled steps rather than lifting one foot as the other lands.
Keep your raised leg bent and close to you, since straightening it or moving it far away from your body makes the bridge harder to hold. If your pelvis drops or turns, use smaller lifts. You can also lower your hips and start again with both feet planted.
Video tutorial
Step-by-step instructions
Lie on your back with bent knees, flat feet and arms beside you.
Press through both feet to raise your pelvis into a stable bridge.
Keep your hips level and lift one bent leg just far enough that your foot clears the floor.
Place that foot gently back in its original position.
Lift the other foot and put it back down, keeping your hips at the same height.
Continue alternating with control, then put both feet down and lower your hips to finish.
Common mistakes
If one side of your pelvis drops with each step, start with smaller foot lifts or shorten the set so your hips stay level.
When your hips start to sink, it’s tempting to stamp the returning foot down to push them back up. Place it gently instead before you switch sides. And if you have to arch your back or hold your breath to keep going, stop and reset your two-foot bridge.
Light hand support is useful, but repeatedly shoving your hips up with your arms suggests the bridge height or leg lift is too demanding. Use a lower bridge or smaller lifts before adding repetitions.
What the science says
Every marching step briefly puts you in a single-leg bridge position. There doesn’t seem to be a study on the march itself, but research on single-leg bridges and bridges with one leg lifted shows what changes when a foot leaves the floor. These studies measured muscle activity in single sessions, which shows how hard a muscle works, not how much it grows.
A 2013 study with 20 healthy adults compared glute activity with activity in a small muscle at the front of the hip (tensor fasciae latae). In both two-leg and single-leg bridges, the side glute muscle and the upper part of the main glute muscle were significantly more active than that hip muscle. Of 11 exercises, the single-leg bridge ranked third for favoring the glutes over the hip muscle.[1]
In 28 healthy adults aged 18–30, a single-leg bridge with the supporting knee bent to 90 degrees worked the main and side glute muscles hard, but the hamstrings even harder. With that knee bent further, to 135 degrees, hamstring activity dropped from 75% to 23% of the maximum while glute activity stayed similar. The researchers tested this because the standard position has been linked to hamstring cramps.[2]
A 2012 study with 29 healthy volunteers measured trunk muscle activity in back, front and side bridges. In the regular two-foot back bridge, the lower back muscles were the most active trunk muscles, at about 17% of their maximum. Lifting one leg increased trunk muscle activity, mostly in the obliques at the sides of your waist, because your trunk then has to resist being twisted.[3]
Sources
- Which Exercises Target the Gluteal Muscles While Minimizing Activation of the Tensor Fascia Lata? Electromyographic Assessment Using Fine-Wire Electrodes. Selkowitz DM, Beneck GJ, Powers CM. Journal of Orthopaedic & Sports Physical Therapy. 2013;43(2):54–64. doi: 10.2519/jospt.2013.4116.
- Building a Better Gluteal Bridge: Electromyographic Analysis of Hip Muscle Activity during Modified Single-leg Bridges. Lehecka BJ, Edwards M, Haverkamp R, Martin L, Porter K, Thach K, et al. International Journal of Sports Physical Therapy. 2017;12(4):543–549. PMID: 28900560.
- Trunk muscle activation during stabilization exercises with single and double leg support. García-Vaquero MP, Moreside JM, Brontons-Gil E, Peco-González N, Vera-Garcia FJ. Journal of Electromyography and Kinesiology. 2012;22(3):398–406. doi: 10.1016/j.jelekin.2012.02.017.