Bridge Hip Abduction
Isolation exercise, Body weightThis article is verified by 4 studies/publications.
Overview
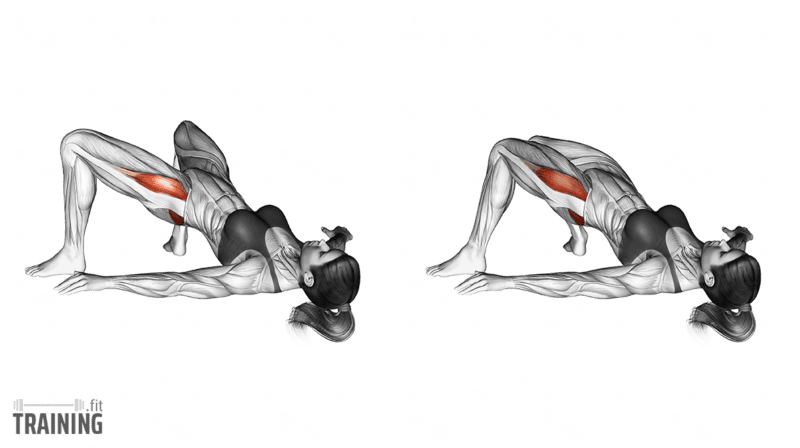
Main muscles
- Buttocks: Large gluteus maximus
(Musculus gluteus maximus) - Buttocks: Gluteus medius muscle
(Musculus gluteus medius)
Training plans
Bridge Hip Abduction is a suitable substitute for similar exercises in Butt training or as a supplement to various training plans.
Bridge Hip Abduction: Basics and alternatives
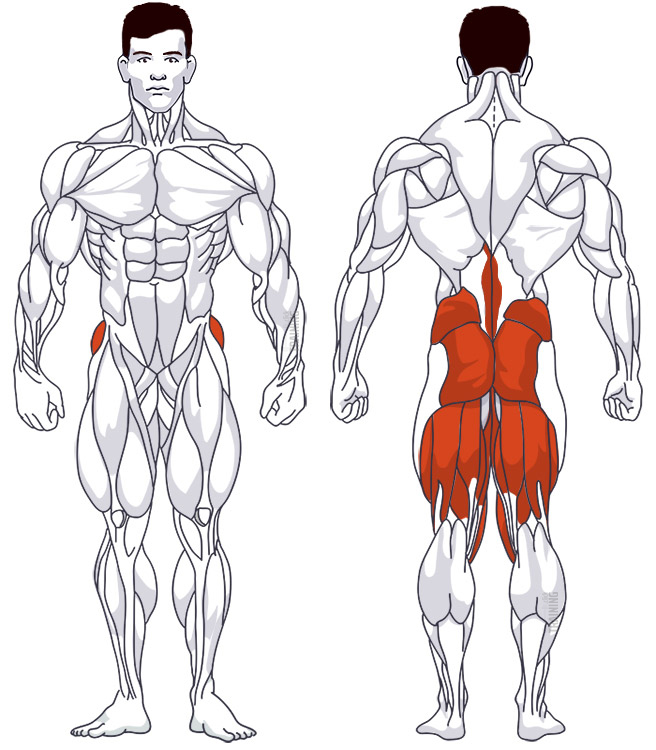
Involved main muscle groups:
Bridge Hip Abduction
Bridge hip abductions combine a hip lift with a small outward knee movement. Keep your hips lifted as you open your knees, then return them above your feet. Your butt holds the bridge and steadies your pelvis while your feet and upper back remain on the floor.
The basic version doesn’t use a band. Once you can hold the bridge steadily, you can add resistance with a light loop band above your knees. Unlike frog pumps, where your knees stay open as you raise and lower your hips, here you hold the bridge and move your knees.
In a study of 21 healthy participants, gluteus maximus activity was higher when they held a bridge with their knees pressing outward against a band than when they held the same knee position without the band. It tested a held position, so it doesn’t show that the band builds more muscle or that it offers an advantage for the repeated knee opening described here.[1]
Correct execution
The bridge stays in place while your knees move apart and back. Holding a lower bridge can help you separate those two tasks if your pelvis drops whenever your legs move.
Lie on your back with your knees bent and your feet about hip-width apart. Tighten your abs and lift your hips into a comfortable bridge, keeping your lower back in its natural position. Once you’re steady, start moving your knees.
Open your knees a small distance, then bring them back above your feet. Keep your pelvis level and your feet supported. A slight shift of pressure through your feet is fine, but don’t force your knees farther out than your foot position allows.
For the band version, place a light loop flat around your thighs just above your knees. Choose resistance that lets you keep your hips at a steady height. Control the return as the band draws your knees inward.
If holding the bridge makes the knee movement too hard, it’s fine to lower your hips between reps. You can also start with just your body weight and add the band later.
Video tutorial
Step-by-step instructions
Lie on your back with your knees bent and both feet on the floor.
Rest your arms beside you and gently tighten your abs.
Press through your feet to lift your hips into a controlled bridge.
Move your knees a small distance apart while keeping your pelvis steady and feet supported.
Bring your knees back over your feet without letting them snap inward.
Repeat the opening and closing, then lower your hips gently to finish.
Common mistakes
Opening your knees too wide can pull your feet off the floor or twist your legs into an uncomfortable position. Reduce the range and let the movement come from your hips.
If you let your hips sink as your knees open, you lose the bridge position. Use a smaller opening or practice the regular glute bridge first. Don’t push your ribs up or arch your lower back to regain height.
What the science says
There doesn’t seem to be a study that has tested the repeated outward knee movement used in this exercise. Studies of bridge holds with the thighs apart or pressing against a band offer some evidence about the effect of moving the thighs outward. These studies measured muscle activity in single sessions, which shows how hard a muscle works, not how much it grows.
In a 2024 study, 10 men and 10 women held 5 bridge variations, including a two-leg bridge with a resistance band around the lower thighs. With the feet flat, the side glute muscle (gluteus medius) reached about 21% of its maximum in the banded bridge and 14% in the regular one. The authors didn’t test this difference statistically, though.[2]
A 2016 study with 10 men and 10 women compared bridges with the thighs parallel or moved 15 or 30 degrees out to the side. The main glute muscle (gluteus maximus) was most active in the widest position. This position also produced less lower back activity and forward pelvic tilt than the narrower positions.[3]
A 2013 study with 20 healthy adults compared the glutes with a hip muscle that also moves the leg outward but turns it inward (tensor fasciae latae). In both two-leg and single-leg bridges, the side glute muscle and the upper part of the main glute muscle were significantly more active than this muscle. Of 11 exercises tested, only the clamshell and side steps favored the glutes over it more than the single-leg bridge did.[4]
Sources
- Isometric hip abduction using a Thera-Band alters gluteus maximus muscle activity and the anterior pelvic tilt angle during bridging exercise. Choi SA, Cynn HS, Yi CH, Kwon OY, Yoon TL, Choi WJ, Lee JH. Journal of Electromyography and Kinesiology. 2015;25(2):310–315. doi: 10.1016/j.jelekin.2014.09.005.
- Effects of Ankle Position While Performing One- and Two-Leg Floor Bridging Exercises on Core and Lower Extremity Muscle Recruitment. Escamilla RF, Thompson IS, Carinci J, MacLean D, MacLean L, Aguinaldo AL. Bioengineering. 2024;11(4):356. doi: 10.3390/bioengineering11040356.
- Modifying the hip abduction angle during bridging exercise can facilitate gluteus maximus activity. Kang SY, Choung SD, Jeon HS. Manual Therapy. 2016;22:211–215. doi: 10.1016/j.math.2015.12.010.
- Which Exercises Target the Gluteal Muscles While Minimizing Activation of the Tensor Fascia Lata? Electromyographic Assessment Using Fine-Wire Electrodes. Selkowitz DM, Beneck GJ, Powers CM. Journal of Orthopaedic & Sports Physical Therapy. 2013;43(2):54–64. doi: 10.2519/jospt.2013.4116.